

The Magnificent Swallowtail Kite

made in USA
KnifeMaker Fingerprint 1 KnifeMaker Fingerprint 2 KnifeMaker Fingerprint 3
Customer's Personal Stencil Addition
Blue Lightning Tips Etch your logo into Damascus Etching Power Supply
Blue Lightning Stencil: Price List
Lockback Folders Bowies page 1 Bowies page 2
Links Tutorials Stabilized Leather
How to etch your Logo into your knife
HARD Felt Knife Honing Wheel Leather Stamp Custom Logo
Contact via email: shrpknife@aol.com
LOGO ALIGNMENT FOR ETCHING
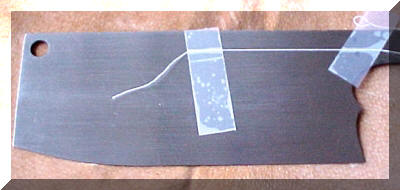
Simple attack on alignment problem. Take a piece of white needle thread and line it up on the blade and tape it to blade. Slip the Logo underneath the string and line it up. Tape the logo in place on one side. Un-tape and remove the
thread. Finish taping the logo to the blade for protection.
Etch away !!
This will also help in the ricasso area, as well. Just run the thread to the back side of the blade and tape it. Place the logo under the thread, tape one side to hold it and protect the steel. Next remove the thread and you're good to tape the other needed areas and etch.
POWER SUPPLY HAND HELD ETCHING
HEAD
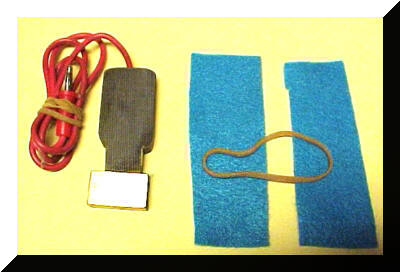
This is the handmade etcher I use.
There is a hole drilled from the top to the bottom of the Micarta handle
too allow the wire to go down to the brass head.
I have a small bolt screwed into the top of the brass head under the Micarta
The wire is soldered into the bolt in the brass head. T
he brass head is epoxy held to the Micarta.
The shape is just to give me a nice grip and hold the two pieces of felt and a rubber band.
The one shown has a flat face in the brass front.
I have another one that has a round face with about a 10" diameter grind.
This is for etching my logo into the hollow ground blade.
If you use a square brass felt holder and press down in a hollow ground blade
it will not etch as good as one that has a 10" diameter grind.
The reason that there are 2 pieces of felt showing is two pieces give you an option.
With only one piece on the hand piece you may be getting too much current flow into the blade.
If so just add an extra piece of felt on the hand piece.
If your power supply has a potentiometer then you can just reduce the current flow
by adjusting it to get the best current flow for you.
Etching a logo into a knife blade: First make sure that the area where the logo is going is clean.
Second I clean my hand piece face.
I have a piece of 320 grit carbide sandpaper taped to the top of the working portion of my desk.
That just provides me with a huge flat sanding block.
I then cut two pieces of felt and attach them to the hand piece with a rubber band.
Next I soak it with the electrolyte.
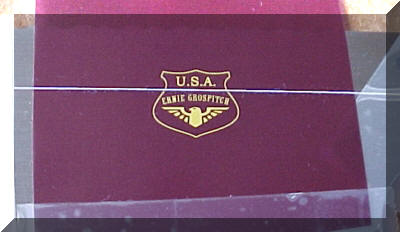
I tape the stencil logo to the knife using 3m Scotch tape.
One advantage over electrical tape is that you can see through it.
This makes it easy to see if the tape has protected the area you don't want to etch.
When you use scotch tape just tape every metal area on the knife
that you might accidently hit with the hand piece.
Use Scotch Magic Transparent tape to hold the logo onto the knife for etching.
No air bubbles should show in the tape and you got it done good.
Electrical tape is hard to deal with and totally unnecessary.
Put the hand piece down on the logo with good heave pressure.
Apply pressure, you want the stencil slap against the steel,
double slap pressure if you can do it. In seconds you will see bubbles.
Lift the hand piece. Then place the hand piece back down over the logo 4 seconds or so.
Raise the hand piece again and go through the same operation.
The 3rd or 4th time is AC time this will blacken the logo.
Next check the work you did by lifting one side of the stencil material. Do not remove it.
This will gives you an opportunity to check and make sure the entire logo etched.
If it didn't etch completely just lay the stencil back down and etch it again.
Remove the stencil material.
Clean the stencil logo using your thumb and index finger with dish soap, rinse it.
Don't use a tooth brush.
Let it drip dry. Place it in an envelope and maybe a desk drawer for storage after it is dry.
For steel it is best to clean the knife in the logo area with a neutralizer.
This is not terribly important for stainless steel.
It is done to remove any electrolyte that may be in the logo.
If it's in there it will encourage rusting. When you finish that do not machine buff.
The reason not to do it is because when you buff you round out the sharply
etched logo plus you will remove a portion of the carbon that enhances the logo.
If you're finished go ahead and sell the knife
HOMEMADE RADIUS ETCHING PAD
If you want to etch your logo into your hollow ground blade,
just make a pad holder with a just slightly smaller radius than the grind.
You can rotate the pad but keep the radius of the pad
tight.
That will work better than a flat pad in the hollow ground
part of the blade.
he flat/square pad is best for flat areas like the ricasso.
Use a good firm down pressure when etching your logo.
I make my own pad using brass for flat or radius etching.
This etching tip for Damascus steel is provided by Master Knifemaker
Mr. Bill Levengood
Step 1: Take the logo area down to a fine finish (600-800 grit)
Step2: Etch your logo.
Step 3: Fill the etched logo with nail polish, use the black color. Just in case some of it does not get removed.
Step 4: Cleanup the logo area with 600 or 800 grit abrasive paper.
Step 5: Etch out your Damascus steel pattern.
Step 6: Use MEK to remove the nail polish and you're finished
CLEANING STENCIL AFTER USE
Put a 1/2 drop of dish detergent between your
thumb and forefinger
and then place the image between the two fingers and lightly scrub back and forth.
Don't use a toothbrush. Rinse with tap water so that there is no soap left in the image.
Pat dry with a paper towel then air dry
and you're ready to etch again.
STORAGE TIP
Store your stencil in an envelope that you can put in a cool dry place.
It should also be stored.....out of the light. If you want to be sure
that light is being kept away just make an aluminum foil envelope and put the stencil inside.
If you have two or more pieces then place a piece of paper between each piece.
Do not lay stencil sections directly on top of each other.
ETCH DEPTH TESTER
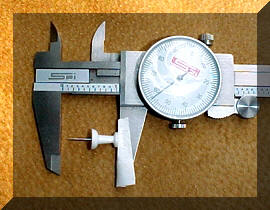
The above picture is a way to test the depth of your etch. Just take a plastic or metal thumb tack and some double adhesive tape and attach it to the inside of your calipers.
Set zero and your good to measure. To flatten the thumbnail end just put it in your drill press and bring it down
against some sandpaper, 220 grit or so. Color of the thumb tack is your color option.
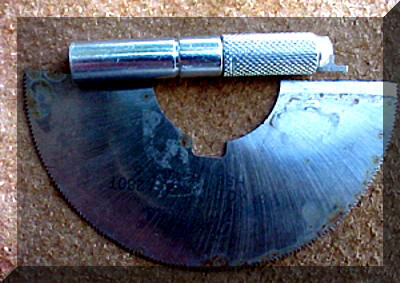
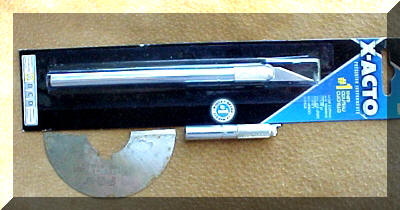
SLVER WIRE INLAY
The below two pictures are for making a tool to cut the groove to accept the Silverwire. The X-acto precision instrument I buy at full length. This one has a handle that is 5 inches long. I buy it long so I can cut it to the comfortable length to use. I cut the pictured holder to 2 inches in length. That is the distance from the tip of my index finger to the second finger joint. This Jeweler's saw blade is .010 " X 3''. They are handy because you can buy them at the thickness you want. They are brittle. I break them in a vise with a hammer or pair of pliers for pieces to use. Best to cover the blade with a light piece of cloth. Why, because the blade may throw a piece at you when you snap/break it. I then grind the back in a pattern to just like the original cutting tip you removed. Next, shape the front of it like the pictured tip and grind sharpen it on a flat platen grinder. Sharpen the tip to about 45 or 30 degree bevel on each side. No need to hold it long because it will grind very fast because it is so thin, Put it into the holder and you're good to go. 90 % of the slot will be made without a hammer. If necessary just tap the top of the cutter. Go only as deep as will take 90% of the Silverwire width. Mine runs .055 inches. I buy the Silver from T.B. Hagstoz & Son, 1-800-922-1006. The saw blade steel is very hard. When you push it in for the groove do NOT flex it sideways because it will snap off. To bring it out just rock it forward and backward and pull it straight up. I buy the Jewelers saw blades from MSC. Two other steels for the grooving tips are the original X-acto tip or a hacksaw blade. NEW : Try the Silver Wire Power Hammer. LINK: TUTORIAL
STENCIL USED TO MARK YOUR KNIFE HANDLE
1. Make your handle...Curly Maple is good
2. Scan your handle on your printer and then make several copies.
Use those
printed copies as a place to draw in the scroll work etc. you may want the
handle to contain.
For the final draw the scroll work etc. with a sharp pen so you get a very sharp
opaque line.
3. Make a stencil of it using the same material you use to make your Knifemaker
logo.
WHY: This will give you an exact stencil guide to transfer the same image from
side to side of the handle.
HOW: Fit the stencil on the handle where you want it.
Take a fine needle punch and follow the stencil pattern. Don't scribe it.
Make punch marks just don't go
deep. Use one side of the stencil line top or bottom.
WAY #2
CS Osborne makes space markers # 5,6, or 7 per inch a little spur wheel with a handle.
Weaver Leather handles them, 1-800-932-8351.
You can use it to follow the stencil scroll pattern line making a line of tiny holes.
This is only for marking the wood. Remove the stencil material and then make
the slot for the Silver wire inlay following along the dotted line.
GENERAL STABILIZING WOOD INFORMATION
Buckeye Burl (Aesculus Californica) is native to the Western United States.
It is one of the most sought after burls by Knifemakers.
Buckeye burl has a spectacular swirling grain pattern
with colors ranging from blue/gray to black with rust and yellar gold thrown in.
This will vary for every knife handle. Personally it is my favorite wood knife handle material.
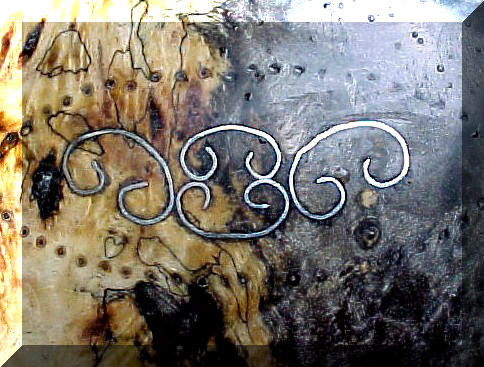
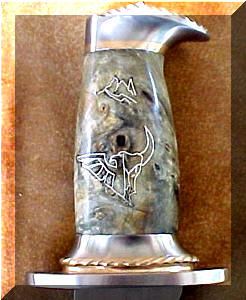
Silver Wire inlay test piece of Stabilized California Buckeye Burl
This inlayed wood is very smooth with no inlay feel.
It has been polished with a loose buffing wheel, with white rouge.
This silver wire inlay was only added to the wood block to see if I could get the stabilizing job done.
The outside drill marks will house a silver rope loop. The piece is intended to go on a leather sheath.
The stabilization process, Loctite Resinol 90C, was completed after the silver wire inlay was installed.
The test inlay was not installed after the wood had been stabilized.
Here is an inlayed knife handle that was stabilized ( by me) after my silver wire inlay.
This etching tip is for blades that are finished by sandblasting
Step 1: Take the image area down to a fine finish (400-600 grit)
Step2: Etch your logo
Step 3: Fill the etched image with nail polish, your choice of color and let it harden
Step 4: Cleanup the image area with 400 or 600 grit abrasive paper.
Step 5: Lightly sandblast the entire blade to the look you want
Step 6: Use MEK to remove the nail polish and you're finished.
Email: shrpknife@aol.com
PROUDLY SERVING THE WORLD

ALABAMA, ALASKA, ARIZONA, ARKANSAS, AUSTRIA, AUSTRALIA, BELGIUM, Brazil, BULGARIA,
CALIFORNIA, CANADA, CZECH REPUBLIC, COLORADO, CONNECTICUT, Costa Rico, CROATIA.
DELAWARE, ENGLAND, FLORIDA, FRANCE, GEORGIA, GREECE,
HAWAII, ICELAND, IDAHO, ILLINOIS, INDIANA, IOWA, IRELAND, ISRAEL, JAPAN, KANSAS, KENTUCKY,
LOUISIANNA MAINE, MARYLAND, MASSACHUSETTS, MICHIGAN, MINNESOTA, MISSISSIPPI, MISSOURI, MONTANA,
NEBRASKA, NETHERLANDS, NEVADA, NEW HAMPSHIRE, NEW JERSEY, NEW MEXICO, NEW SOUTH WALES,
NEW YORK, NEW ZEALAND, NORTH CAROLINA, NOVA SCOTIA,
OHIO, OKLAHOMA, OREGON, PENNSYLVANIA, RHODE ISLAND, PORTUGAL,
SCOTLAND, SINGAPORE, SOUTH CAROLINA, SOUTH DAKOTA, SWEDEN, SWITZERLAND, THAILAND,
TASMANIA, TENNESSEE, TEXAS, UNITED KINGDOM, UTAH, VIRGINIA, WALES,
WASHINGTON, WEST VIRGINIA, WISCONSIN, and WYOMING.